Running your own full node to solo mine Bitcoin is about as pure as cryptocurrency mining gets. No pools, no middlemen, no sharing rewards. Just you, your hardware, and the blockchain. When you find a block, you keep the entire $67,523 block reward.
Is it realistic? Honestly depends on your hashrate.
But there’s something genuinely satisfying about running the entire stack yourself. You’re not just pointing a miner at someone else’s infrastructure — you’re validating transactions, securing the network, and maintaining your own independent copy of Bitcoin’s entire transaction history since 2009.
This guide walks through the actual process. We’ll cover hardware requirements, Bitcoin Core installation, configuration tweaks that matter, and how to connect your ASIC miners directly to your node. Also the math behind solo mining odds, because you need to know what you’re getting into.
Why Run Your Own Full Node for Solo Mining Bitcoin
Most people who try solo mining use services like CKPool. Nothing wrong with that approach — I’ve written about CKPool setup before and it’s a solid option.
Running your own node is different.
When you operate a full node, you’re verifying every single transaction yourself. You’re not trusting someone else’s node to tell you what’s valid. For solo miners, this means you’re building block templates from your own mempool, selecting transactions based on fees you see, and broadcasting blocks you find directly to the network.
Privacy matters here too. When you point miners at a third-party service, that service sees your hashrate, IP address, and payout address. Your own node? Nobody knows what you’re doing.
The technical knowledge you gain is worth something. Understanding how Bitcoin Core works, how blocks are constructed, how the mempool functions — this stuff makes you a better miner. You’ll actually understand what’s happening when difficulty adjusts or when transaction fees spike.
Downside? You need to maintain the node. Updates, disk space management, occasional troubleshooting. It’s more work than just plugging into CKPool.
Hardware Requirements for Running a Bitcoin Full Node
Let’s talk about what your node computer actually needs. This is separate from your mining hardware — we’re talking about the machine running Bitcoin Core.
Disk space is your biggest concern. The Bitcoin blockchain is currently around 600 GB and growing. You need at least 1 TB of storage, realistically 2 TB if you don’t want to worry about it for a few years.
SSD makes a massive difference. I ran a node on an old hard drive once and initial blockchain sync took nearly two weeks. Switched to an SSD, subsequent syncs after downtime were 10x faster. Transaction verification happens constantly, and slow disk I/O creates bottlenecks.
RAM matters less, but 8 GB is minimum. Bitcoin Core will use what you give it for caching, which speeds up block validation. If you’re running other services on the same machine, go with 16 GB.
CPU doesn’t need to be crazy powerful. Any modern quad-core processor handles it fine. During initial sync, more cores help, but steady-state operation is pretty light. An old i5 or Ryzen 5 works well.
Network bandwidth is often overlooked. You’ll download the entire blockchain during initial sync — that’s 600+ GB right there. After that, your node constantly communicates with peers, validates blocks, relays transactions. Budget at least 500 GB monthly bandwidth, ideally 1 TB. If you’re on a metered connection, this could get expensive.
A dedicated machine makes sense. You can technically run Bitcoin Core on your gaming PC or workstation, but mining is a 24/7 operation. You want that node running continuously. A used office PC works great — something like a Dell Optiplex with an i5, 16 GB RAM, and a 2 TB SSD installed.
Solid choice for a dedicated node computer. Most refurb models come with i5/i7, 16GB RAM, and you can add an SSD easily. Runs quiet and uses minimal power.
Reliable drive for blockchain storage. Fast enough for Bitcoin Core’s needs, and 2TB gives you room for several years of blockchain growth.
Step 1: Download and Install Bitcoin Core
Bitcoin Core is the reference implementation of Bitcoin. It’s the software that defines how Bitcoin works. Head to bitcoin.org (make sure it’s .org, not .com) and download the latest version for your operating system.
At the time I’m writing this, we’re on version 27.x. Always grab the latest stable release.
For Windows, you’ll download an .exe installer. Linux users can grab the .tar.gz archive. Mac has a .dmg file. Installation is straightforward — no tricks or weird settings needed initially.
When you first launch Bitcoin Core, it asks where you want to store the blockchain data. Default location is usually fine, but if you installed a dedicated SSD for this, point it there. This choice matters because moving the blockchain later is annoying.
The GUI will launch and immediately start connecting to peers. You’ll see the sync progress at the bottom — it’ll say something like “Synchronizing with network” and show a percentage.
Initial blockchain sync takes time. Depending on your hardware and connection, anywhere from 12 hours to several days. On a modern system with SSD and decent internet, usually 24-48 hours. Let it run. Don’t interrupt it unnecessarily.
During this sync, your machine is downloading every block ever created, verifying every transaction, and building the full UTXO set. It’s CPU and disk intensive. The computer might run warm. That’s normal.
Step 2: Configure Bitcoin Core for Solo Mining
Once your node is fully synced, you need to configure it for mining. Bitcoin Core has built-in mining functionality through its RPC interface, which is what your miners will connect to.
First, you need to create a configuration file. Navigate to your Bitcoin data directory:
- Windows:
C:UsersYourUsernameAppDataRoamingBitcoin - Linux:
~/.bitcoin - Mac:
~/Library/Application Support/Bitcoin
Create a file called bitcoin.conf in that directory. Here’s a basic configuration for solo mining:
server=1
rpcuser=yourusername
rpcpassword=yourpassword
rpcallowip=192.168.1.0/24
rpcbind=0.0.0.0
Let me break down what these do:
server=1 enables the RPC server, which your miners need to communicate with the node.
rpcuser and rpcpassword are credentials your mining software will use. Pick something secure, not the example above. This isn’t protecting your Bitcoin directly, but someone with RPC access could potentially mess with your node.
rpcallowip defines which IP addresses can connect to your RPC interface. The example allows any device on the 192.168.1.x subnet. Adjust this to match your local network. If your miners are on the same machine as the node, you can use rpcallowip=127.0.0.1 instead.
rpcbind=0.0.0.0 allows RPC connections from any network interface. If you’re only mining locally, you can omit this.
Save the file and restart Bitcoin Core. The GUI might look the same, but now your node is listening for mining connections.
For wallet configuration, you’ll want an address where block rewards get sent. In Bitcoin Core, create a new receiving address through the GUI. Label it something like “Solo Mining Rewards” so you remember what it’s for. You’ll need this address later.
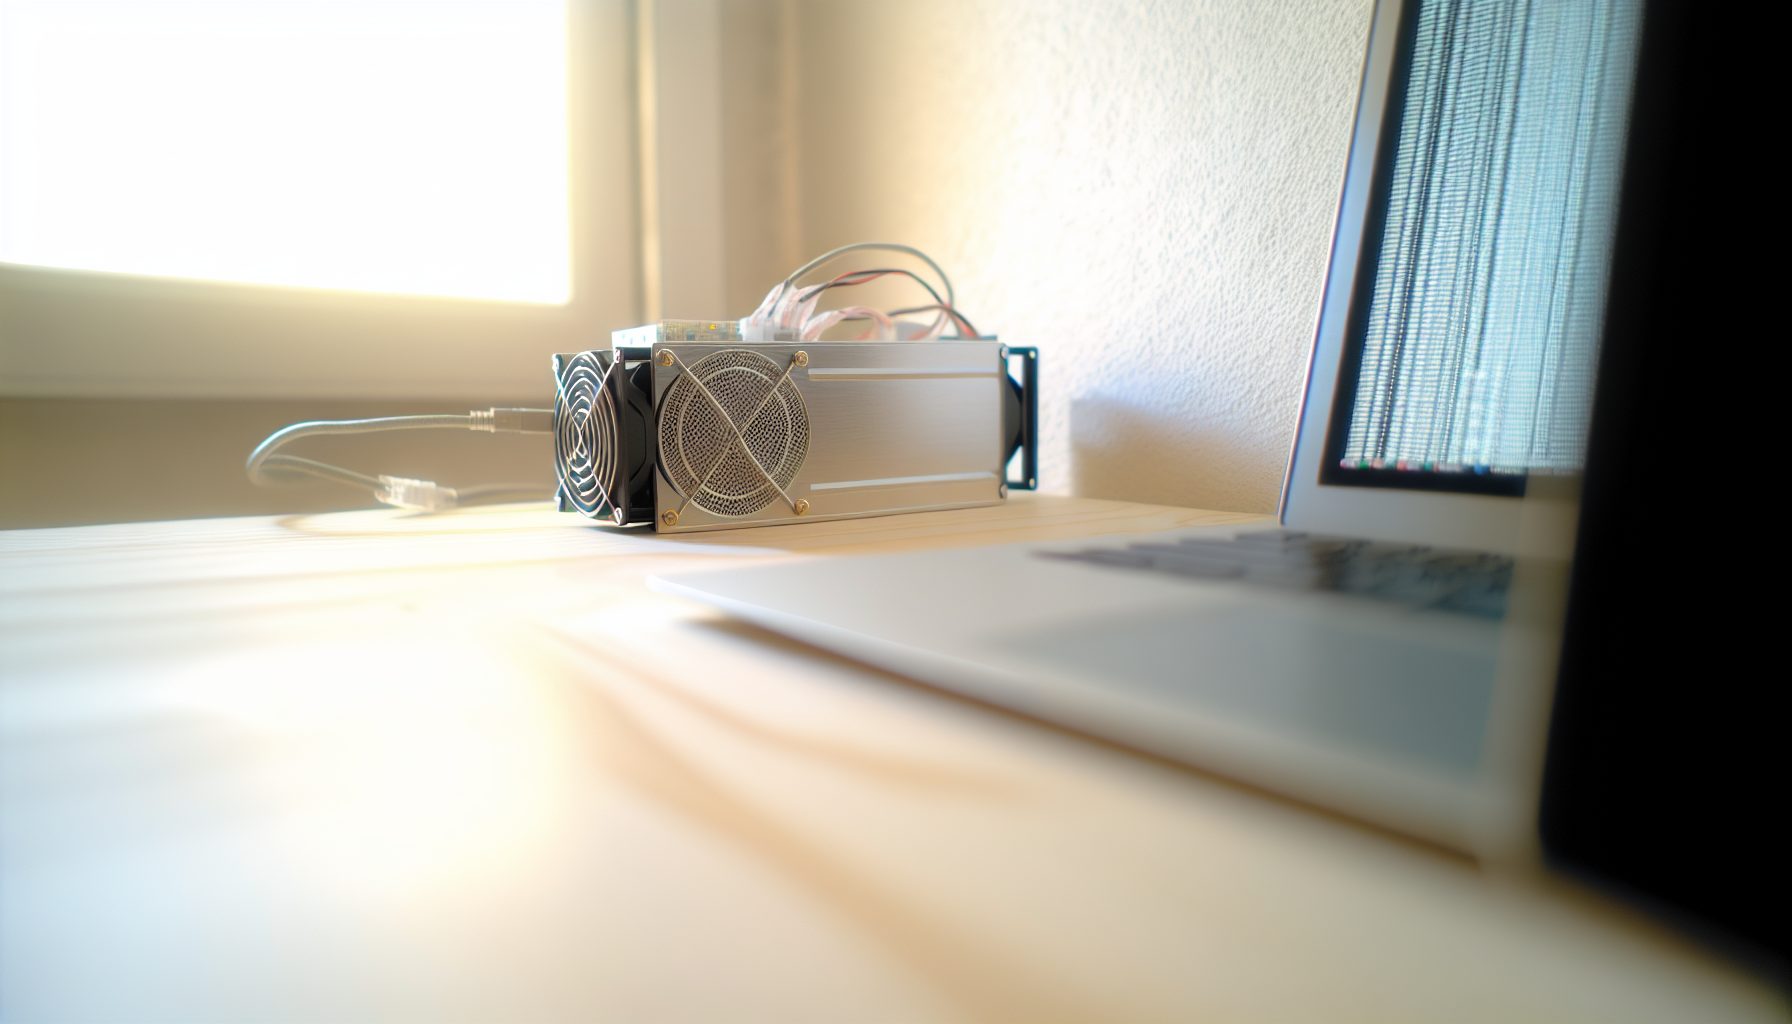
Step 3: Connect Your Mining Hardware
Now comes the interesting part — actually pointing your miners at your node.
Most modern ASIC miners use cgminer or bmminer firmware with Stratum protocol support. Your Bitcoin Core node doesn’t speak Stratum natively. You need a translation layer called a Stratum mining proxy.
The most common option is a tool called bitcoin-mining-proxy or similar software. Actually, many solo miners use a simpler approach: solo.ckpool.org configuration pointed at your own node.
Wait, that sounds confusing. Let me clarify.
You can run getblocktemplate-compatible proxy software that sits between your miners and your Bitcoin Core node. This proxy speaks Stratum to your miners and getblocktemplate to your node. Projects like ckproxy (part of the CKPool suite) work well for this.
To set up ckproxy:
Clone the repository (assuming Linux here):
git clone https://bitbucket.org/ckolivas/ckpool.git
cd ckpool
./configure --enable-ckproxy
make
Create a configuration file for ckproxy:
{
"proxy" : "localhost:3333",
"nodeserver" : "localhost:8332",
"nodeuser" : "yourusername",
"nodepass" : "yourpassword",
"btcaddress" : "your_mining_address_here",
"logdir" : "/var/log/ckproxy"
}
Start ckproxy with:
./ckproxy -c ckproxy.conf
Your miners then connect to localhost:3333 (or whatever port you specified) just like they would connect to any Stratum pool. But instead of sending work to a pool, they’re getting work from your own node.
For ASIC configuration: In your miner’s web interface, you’ll typically see pool configuration with three URLs. For solo mining with your node:
- URL:
stratum+tcp://YOUR_NODE_IP:3333 - Worker: anything (doesn’t matter for solo)
- Password: anything
If your node and miners are on the same local network, use the node’s local IP. If they’re on the same machine, use 127.0.0.1.
Your miner should connect, start submitting shares, and show your hashrate. Unlike pool mining, you won’t see accepted shares counting toward some pool balance. You’re just generating hashes. When you find a valid block, it gets submitted to your node, and your node broadcasts it to the network.
Understanding Your Solo Mining Odds with a Full Node
Let’s talk about the elephant in the room: your chances of actually finding a block.
Bitcoin’s current network hashrate fluctuates around 600-700 EH/s (exahashes per second). That’s 600,000,000 TH/s. If you’re running a single Antminer S19 Pro at 110 TH/s, you control roughly 0.000018% of the network hashrate.
Blocks are found every 10 minutes on average. That’s 144 blocks per day, 52,560 per year. Your expected time to find a block with 110 TH/s?
Roughly 9,800 years.
That’s not a typo. With one miner, you’re looking at millennia between blocks. Could you get lucky tomorrow? Sure. Could you run for 20 years and find nothing? Also possible. This is what people mean when they say solo mining Bitcoin is like a lottery.
Here’s the math for different hashrate levels:
- 110 TH/s (one S19 Pro): ~9,800 years average
- 1 PH/s (about 10 S19 Pros): ~1,080 years
- 10 PH/s (about 100 S19 Pros): ~108 years
- 100 PH/s (about 1,000 S19 Pros): ~10.8 years
You need serious hardware to get into “might happen in your lifetime” territory. This is why I always recommend checking out our article on whether solo mining is worth it — it’s not for everyone, and that’s okay.
Running your own node doesn’t change these odds. It gives you independence and privacy, but your probability of finding a block is purely a function of your hashrate versus the network’s total hashrate.
Some people solo mine with small hashrate anyway. Maybe they already own the hardware, electricity is cheap, and they think of it as a long-shot ticket that runs 24/7. Others genuinely have hundreds of terahashes pointed at their node and see blocks occasionally.
For more on how the math works, check out our guide on how difficulty affects solo miners.
Monitoring Your Node and Mining Operation
Once everything’s running, you need to keep an eye on it. Solo mining means nobody else is monitoring your operation for you.
Node monitoring: Bitcoin Core’s GUI shows basic stats — number of connections, latest block, blockchain size. For more detailed info, use the debug console (Help > Debug Window > Console) to run RPC commands:
getblockchaininfo— shows sync status, current height, difficultygetnetworkinfo— network connections and version infogetmininginfo— mining-related stats (though most useful stats come from your proxy)getmempoolinfo— how many transactions are waiting in your mempool
Check your node has good peer connections. I usually see 10-20 outbound connections. If you’re consistently below 8, might be a firewall issue.
Mining monitoring: Your mining proxy logs will show when miners connect, their hashrate, and submitted shares. With ckproxy, check the log directory you specified. You’ll see real-time updates as your miners work.
Most ASIC miners have built-in monitoring dashboards. Log into your miner’s web interface regularly to check:
- Hashrate stability — should be consistent with specs
- Temperature — chip temps usually run 60-80°C depending on model
- Fan speeds — make sure cooling is working
- Hardware errors — occasional errors are normal, but high error rates indicate problems
I set calendar reminders to check my node weekly. Takes five minutes. Look for anything unusual — sudden drop in hashrate, unexpected node restarts, excessive disk usage growth.
Electricity cost tracking is important. A single S19 Pro pulls about 3250W. At $0.10/kWh, that’s $7.80 per day, $234 per month. With average block-finding time measured in thousands of years, you’re spending money with no guaranteed return. Be honest with yourself about this. If you can’t afford to burn that electricity cost indefinitely, maybe solo mining Bitcoin isn’t the right approach.
Some miners consider it a hobby expense, like paying for a gym membership or streaming services. Others hope to hit a block and make it all back in one shot. Just understand what you’re getting into financially.
What Happens When You Find a Block
Let’s imagine the unlikely but exciting scenario: your miner submits a share that’s valid enough to be a block.
Here’s what happens:
Your mining proxy receives the solution from your ASIC. It immediately checks if this solution meets Bitcoin’s difficulty target. If it does, it’s a valid block. The proxy forwards it to your Bitcoin Core node via RPC.
Your node validates the block one more time (can’t be too careful), then broadcasts it to all connected peers. Those peers validate it and broadcast it further. Within seconds, your block propagates across the entire Bitcoin network.
Other miners receive your block and switch to building on top of it. The race for the next block begins.
Your block reward — currently 3.125 BTC plus transaction fees — gets sent to the address you specified in your mining configuration. It won’t show as spendable immediately. Bitcoin requires 100 confirmations (about 16.6 hours) before you can spend newly mined coins.
You can watch your block on any blockchain explorer. Search for your mining address and you’ll see the coinbase transaction with your reward. Pretty cool feeling, from what I hear. I’ve never personally hit a block solo mining Bitcoin — my hashrate’s nowhere near sufficient — but I’ve talked to people who have.
One guy I know ran 50 S9 miners back in 2018 for eight months before hitting a block. Said his hands were shaking when he saw the notification. Eight months of electricity cost paid off in one moment. Of course, if he’d pool mined that whole time, he’d have made more money total. But there’s something about that full block reward that makes people chase it.
For more on understanding what you actually earn when you find a block, see our article on solo mining block rewards.
Common Problems and Troubleshooting
Miners won’t connect: Usually a configuration issue. Check your bitcoin.conf rpcallowip settings. Make sure your firewall allows connections on the proxy port (typically 3333). Verify your node IP address is correct.
Node keeps going out of sync: Might be a network problem or insufficient resources. Check disk space — if you’re within a few GB of full, Bitcoin Core can have issues. Also verify your internet connection is stable. Node sync requires reliable connectivity.
Extremely slow blockchain sync: Almost always disk I/O bottleneck. If you’re on a hard drive, consider upgrading to SSD. Also check if other software is competing for disk resources. Close unnecessary programs during initial sync.
High CPU usage: Normal during initial sync and when receiving new blocks. If it’s constant and extreme after sync completes, might be worth checking for resource-intensive txindex settings (if you enabled that) or excessive mempool size.
Mining proxy crashes: Check logs first. Might be a configuration error or compatibility issue. Make sure your proxy software version matches your Bitcoin Core version’s RPC interface. Some older proxies don’t work with newest Core versions.
No shares being submitted: Verify miners are actually running and showing hashrate in their interface. Check network connectivity between miners and proxy. Look at proxy logs to see if it’s receiving work requests from miners.
For more general troubleshooting concepts, the solo mining terminology guide helps clarify what different error messages mean.
Alternatives to Running Your Own Node
Honestly? Running a full node for solo mining is overkill for most people.
If your goal is just to try solo mining without pool fees, services like CKPool make way more sense. You point your miners at solo.ckpool.org, and you’re solo mining within five minutes. No node maintenance, no disk space management, no initial blockchain sync wait.
CKPool uses the same block reward split — you find a block, you get everything minus a tiny 0.5% fee. That’s a fair trade for not having to run infrastructure.
The difference between true solo mining and lottery mining through services like CKPool is mostly philosophical. Functionally, you’re still taking the same odds and getting the same rewards.
Your own node makes sense if:
- You want maximum privacy
- You’re interested in Bitcoin infrastructure and want to learn
- You’re already running a node for other reasons (personal wallet, developer work)
- You have serious hashrate and want full control over block templates
For everyone else, using an established service is simpler.
If you’re specifically interested in solo mining other coins where odds are better, check out guides like solo mining Alephium or solo mining Ergo — both have much lower network hashrates and more realistic block-finding timelines.
Realistic Expectations and Final Thoughts
Let me be direct: if you’re setting this up hoping to make money, you’re probably going to be disappointed.
Solo mining Bitcoin with your own full node is a technical exercise. It’s for people who want to understand how Bitcoin works at a fundamental level, who value independence and privacy, or who already have significant hashrate and can absorb the risk.
The electricity cost alone is substantial. Let’s say you’re running 10 TH/s of mining power — pretty modest by today’s standards. Depending on your hardware efficiency, that’s maybe 1000-1500W. At $0.10/kWh, roughly $75-110 per month. Your expected time to find a block? Over 10,000 years.
Could you get lucky? Absolutely. Someone mines a solo block every so often with small hashrate. But banking on luck isn’t a strategy.
I think running a full node is worthwhile regardless of mining. Supporting the Bitcoin network, having your own validation source, learning how the protocol works — these have value beyond potential mining rewards. If you were going to run a node anyway, pointing some hashrate at it for solo mining doesn’t hurt. Just don’t expect income.
For people serious about mining as income, pool mining makes sense. Steady payouts, predictable returns, professional infrastructure. Solo mining is for hobbyists, enthusiasts, and people with huge operations who can statistically expect to hit blocks.
The knowledge you gain from this process has value though. You’ll understand how blocks are constructed, how mining actually secures the network, how transaction fees work. That education is worth something, even if your mining rewards are zero.
Secure Your Winnings
Finding a solo block means receiving 3.125 BTC directly to your wallet — currently worth over $250,000. That amount should never sit on an exchange.
Two hardware wallets we recommend for solo miners:
Ledger Nano X (~$149) — Industry standard, supports BTC natively
Buy Ledger Nano X
Trezor Model T (~$179) — Open-source firmware, strong community trust
Buy Trezor Model T
FAQ: Solo Mining Bitcoin with Your Own Full Node
Do I need to run a full node to solo mine Bitcoin?
No, technically you don’t. You can use services like CKPool that let you solo mine through their infrastructure. Running your own node gives you more control and privacy, but it’s not required. For most people, using CKPool is simpler and achieves the same goal of keeping full block rewards when you find one. Only run your own node if you specifically want the independence and are willing to handle the maintenance.
How much does it cost to run a Bitcoin full node?
Hardware wise, you can build a decent node computer for $300-500 using refurbished equipment. The bigger ongoing cost is electricity and internet. The node itself only uses 50-100W typically, so maybe $3-7 per month in electricity. Your mining hardware is the expensive part — an Antminer S19 Pro running 24/7 costs around $235 per month at $0.10/kWh. Don’t forget to budget at least 500 GB monthly bandwidth for node operations.
What happens if my node goes offline while mining?
Your miners will stop getting work and basically sit idle until the node comes back. You’re not losing any progress because each hash attempt is independent — there’s no accumulated work that gets lost. When your node restarts and syncs back up, mining resumes where it left off. The main concern is wasted time during downtime, since you’re still paying for electricity but not mining. Keep your node stable with UPS backup if power reliability is an issue in your area.
Can I mine other cryptocurrencies using my Bitcoin full node?
No, a Bitcoin node only supports Bitcoin mining. Other cryptocurrencies require their own node software. For example, Litecoin needs Litecoin Core, Monero needs the Monero daemon, etc. Each blockchain has its own node implementation. If you want to solo mine multiple coins, you’d need to run separate nodes for each one. The good news is that many altcoin nodes are less resource-intensive than Bitcoin’s because their blockchains are smaller.
Is solo mining Bitcoin more profitable than pool mining?
For small miners, definitely not. Pool mining gives you steady, predictable income proportional to your hashrate. Solo mining with small hashrate means you’ll likely earn nothing for years or decades, even though the potential single payout is much larger. The expected value over time is roughly the same (actually slightly higher for solo due to no pool fees), but the variance is extreme. Only consider solo mining if you can afford to burn electricity costs indefinitely without any return, or if you have massive hashrate where you might realistically find blocks.