TL;DR: Running ASICs for solo mining at home means dealing with serious noise — we’re talking 70-80 dB, which is basically a vacuum cleaner running 24/7 in your room. This guide covers every noise reduction method I’ve researched and tested, from $20 fan mods to full immersion cooling setups. I’ll give you real decibel numbers, actual costs, and honest assessments of what works for solo miners on different budgets.
Real talk: The noise is the single biggest reason most people give up on home mining. I’ve seen forum posts from people who bought an S19 thinking “how loud could it be?” and then had to move it to their garage after their family threatened to throw it out a window.
Why ASIC Miner Noise Reduction Matters for Home Solo Mining
Here’s the thing about solo mining at home — you need to run your hardware constantly to have any chance at hitting a block. That means 24/7 operation, not just when you’re out of the house or don’t mind the noise.
Stock ASICs are designed for warehouse environments where nobody cares about noise. An Antminer S19 Pro runs at around 75 dB. For reference, that’s about as loud as a kitchen blender or a busy street with heavy traffic. Except your blender runs for 30 seconds to make a smoothie, and your ASIC runs for months.
I learned this the hard way when I first set up my dad’s old Antminer L3+ in my bedroom. The first night I couldn’t sleep. The second night I tried earplugs. By the third night I had moved it to the basement, which honestly should have been the obvious first choice.
The cool part is: noise reduction for solo mining isn’t just about comfort. Lower noise usually means better cooling efficiency, which can improve your hashrate stability. A miner that’s running cooler will throttle less and deliver more consistent performance over time.
Understanding ASIC Noise: Where Does It Actually Come From?
Before you start throwing money at solutions, you need to understand what’s making all that racket.
The noise from an ASIC miner comes from three main sources, but one dominates everything else: the cooling fans. ASICs generate massive heat — an Antminer L7 pulls 3425W, and almost all of that becomes heat. To dissipate that much thermal energy, manufacturers install industrial fans that push huge amounts of air through the heatsinks.
These fans typically run at 4000-6000 RPM. That’s way faster than your PC case fans, which usually max out around 2000 RPM. The higher the RPM, the more noise you get from both the motor and the air turbulence.
The second noise source is the power supply. Some PSUs have their own cooling fan that adds to the total decibel count. The third source is electrical humming from the components themselves, but this is usually negligible compared to the fans.
Most stock ASICs use 120mm fans with 5000+ RPM capability. Some newer models like the Antminer S21 use larger fans at lower RPM, which helps a bit, but they’re still loud by household standards.
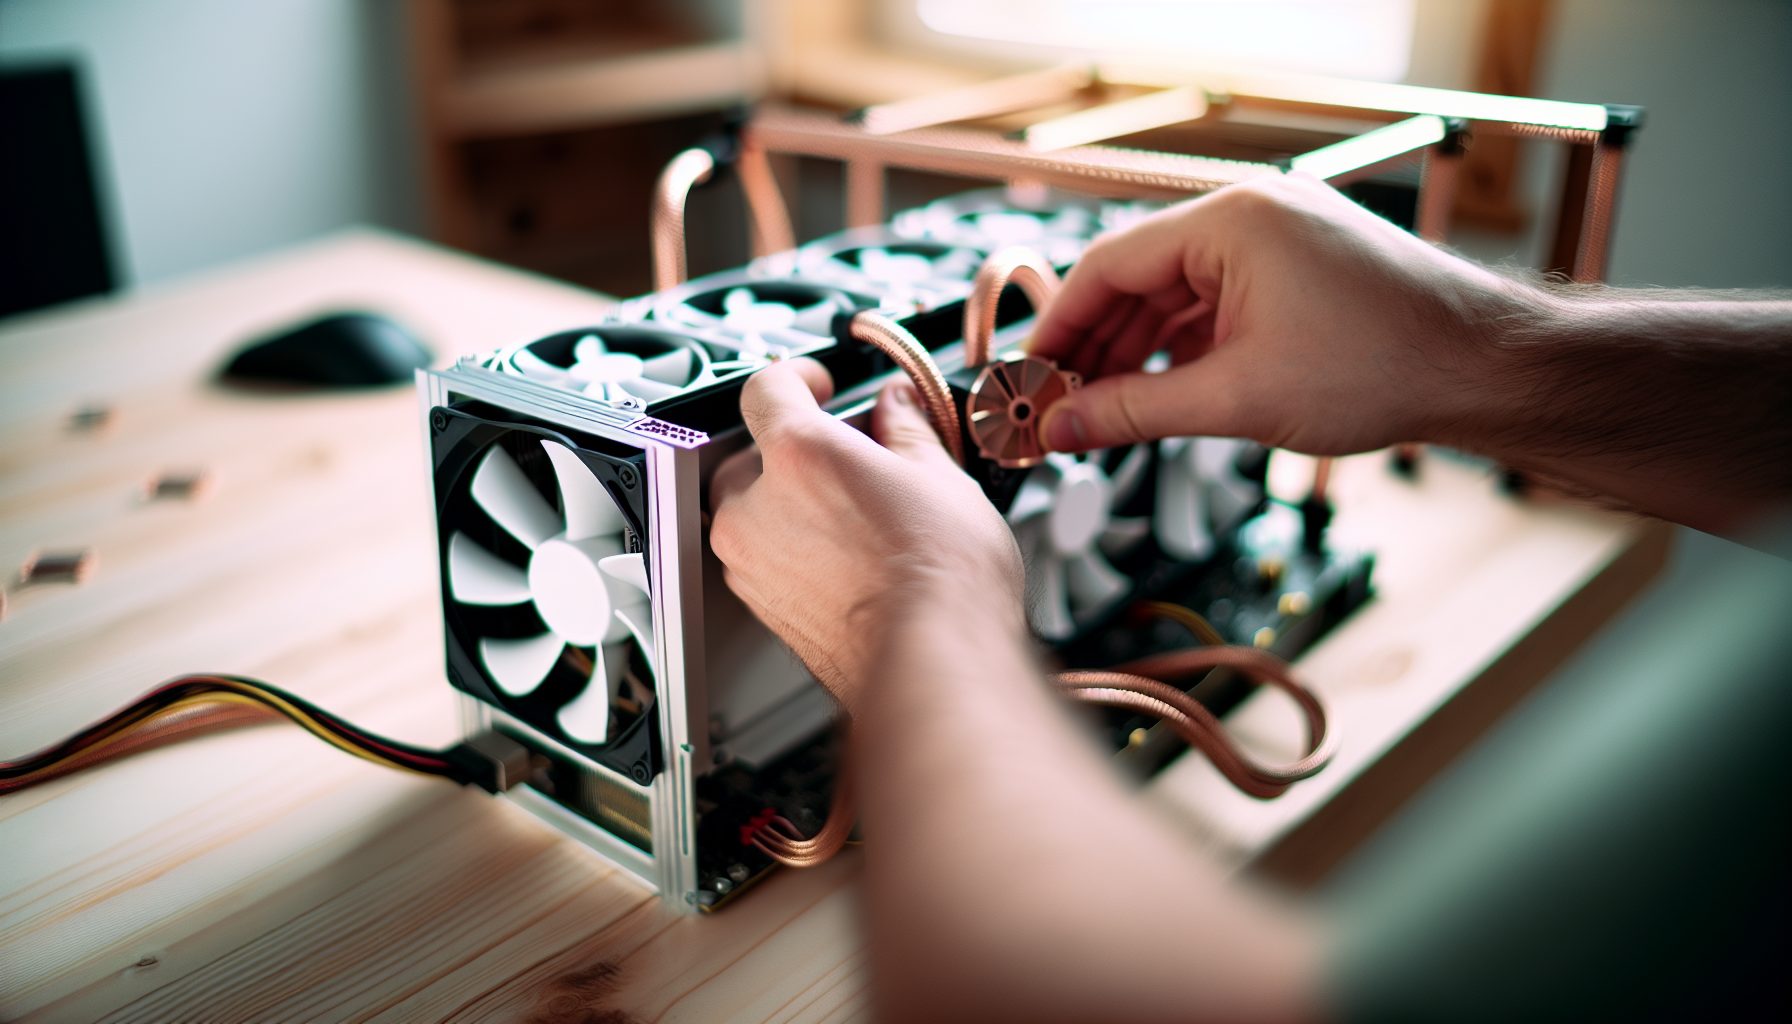
Fan Replacement: The Most Cost-Effective Noise Reduction Method
Replacing the stock fans with quieter alternatives is where most people start, and honestly it’s the best bang for your buck if you’re solo mining at home.
The basic concept is simple: swap the loud industrial fans for quieter PC fans that move enough air to keep your ASIC cool. The challenge is finding fans that can push sufficient CFM (cubic feet per minute) while running quieter than stock.
Fan replacement typically reduces noise by 10-20 dB, which makes a huge difference to your ears. Going from 75 dB to 60 dB is the difference between a vacuum cleaner and a normal conversation.
For most ASICs, you’ll want high-static-pressure fans designed for radiators or dense heatsinks. Regular case fans won’t cut it — they need to push air through the tightly-packed ASIC heatsinks. Look for fans rated at 3-4 mmH2O static pressure minimum.
140mm industrial fan rated for 3000 RPM, 158.5 CFM, and 41.3 dB. The gold standard for ASIC fan replacements — expensive but genuinely quiet and moves serious air.
120mm fan that runs 1800 RPM and pushes 56.3 CFM at 22.5 dB. Budget option that works for smaller miners like Bitaxe setups or older L3+ units.
Important warning: Fan replacement voids your warranty on most ASICs. Also, if you go too quiet with fans that don’t move enough air, you’ll thermal-throttle or damage your hardware. I’ve seen people install silent fans thinking they were being smart, only to have their miner shut down from overheating after an hour.
You need to monitor your temperatures obsessively for the first few days after a fan swap. Most ASICs have temp readouts in their web interface — watch those chip temps like a hawk. If they’re climbing above 80°C, your new fans aren’t cutting it.
Practical Fan Mod Process
For something like an Antminer KS7 or similar ASIC, here’s what the process actually looks like:
- Power down the miner completely and unplug it (obvious but people skip this)
- Remove the case screws and slide off the cover panels
- Disconnect the stock fan connectors — usually 4-pin or 6-pin depending on the model
- Unscrew the old fans and remove them
- Mount the new fans with the same screw holes (you might need longer screws)
- Connect the new fans to the ASIC control board using fan adapter cables
- Power on and immediately check the web interface for temps
The fan adapter cables are critical. Most ASICs use proprietary fan connectors, so you’ll need adapters to connect standard 4-pin PWM PC fans. These cost like $5 on Amazon but they’re essential.
One thing I messed up on my first fan mod: airflow direction. Make sure your new fans are pulling air through the heatsink in the same direction as the stock fans. There’s usually an arrow on the fan frame showing airflow direction. Getting this backwards will cook your hardware fast.
Enclosure Solutions: Soundproofing Boxes and Mining Cabinets
If fan replacement isn’t enough, or if you want to keep the stock fans for maximum cooling, building or buying a soundproof enclosure is the next step up.
A properly designed mining enclosure can reduce perceived noise by 20-30 dB. That’s massive — it can take a miner from “completely unbearable” to “runs in the background like a loud PC.”
The basic principle is simple: put the noisy thing in a box lined with acoustic foam. The execution is where people screw up. A poorly designed enclosure will trap heat and thermal-throttle your miner, completely defeating the purpose of running it.
Key requirements for any mining enclosure:
- Adequate ventilation — you need intake and exhaust fans to move air through the box
- Acoustic foam lining on all interior surfaces (at least 2 inches thick)
- Sealed seams to prevent sound leakage
- Ducting for exhaust air so the hot air doesn’t just recirculate
DIY enclosures usually cost $150-300 in materials if you build them yourself. Pre-made mining cabinets run $500-1500 depending on size and features. For solo mining setups, that cost adds up quickly since you’re not making steady pool income — you’re literally gambling on hitting a block.
I looked into building one for my setup but honestly, with just a Bitaxe running, it didn’t make sense financially. If I ever upgrade to a full-size ASIC for serious solo mining attempts, an enclosure would be priority number one.
Commercial Mining Enclosure Options
Pre-built acoustic cabinet designed for single ASIC miners, claims 30 dB reduction. Includes built-in ventilation fans and acoustic ducting for exhaust.
The advantage of buying a commercial solution is that someone else has already solved the heat management problem. The disadvantage is the price tag — these things are not cheap.
For a DIY approach, you’re looking at building a box from 3/4″ plywood or MDF, lining it with 2″ acoustic foam, and installing inline duct fans for ventilation. The exhaust needs to be ducted outside or into a space where the hot air isn’t a problem. Running the exhaust into your living space defeats the whole purpose since you’ll just heat up your house.
Immersion Cooling: The Ultimate Noise Solution for Serious Solo Miners
Okay, now we’re getting into the really interesting territory. Immersion cooling means submerging your entire ASIC in a tank of dielectric fluid — basically special oil that doesn’t conduct electricity but absorbs heat really well.
The noise reduction is absolute. No fans means no noise. An immersion-cooled mining setup runs at basically the noise level of a aquarium pump — maybe 35-40 dB at most. That’s quiet enough to have in your bedroom without it bothering you.
But here’s the reality check: immersion cooling is expensive and complicated. You’re looking at $1000-3000+ for a proper setup, depending on the size of your operation. For a solo miner who might never hit a block, that’s a tough investment to justify.
The basic components you need:
- A sealed tank or container large enough to fully submerge your ASIC(s)
- Dielectric cooling fluid (usually 3M Novec or mineral oil)
- A heat exchanger or radiator system to cool the fluid
- A pump to circulate the fluid through the heat exchanger
- Monitoring equipment to watch fluid temps and ensure circulation
The process involves completely removing the stock fans from your ASIC (since they’d just be pushing against fluid resistance anyway), mounting the bare boards in the tank, filling it with coolant, and setting up the circulation system.
Honest warning: I’ve never done immersion cooling myself. At 13, I don’t have the budget or the space for it. But I’ve watched every YouTube video about it and spent way too much time in mining forums reading about people’s setups. It’s genuinely cool technology, but it’s definitely advanced-level stuff.
The advantage beyond noise is heat management. Fluid cooling is more efficient than air cooling, which means you can potentially overclock your ASICs safely and get higher hashrates. Some people report 5-10% hashrate improvements from better thermal performance.
Immersion Cooling Fluids
The type of fluid matters a lot. You have three main options:
Mineral oil: Cheapest option at around $50-100 for enough to fill a small tank. Food-safe, non-toxic, but messy. Mineral oil never fully dries, so maintenance is annoying. It also breaks down over time and needs replacement every 1-2 years.
3M Novec fluids: Engineered dielectric fluids designed specifically for electronics cooling. Much better thermal properties than mineral oil, but expensive — like $400-600 per gallon. This is what professional mining operations use.
Hydrocarbon-based fluids: Middle ground between mineral oil and Novec. Better than mineral oil, cheaper than Novec. Brands like BitCool and similar products designed for crypto mining.
For a small solo mining setup with one or two ASICs, you’re probably looking at needing 5-10 gallons of fluid depending on your tank size. That’s $250-6000 just for the coolant, which is insane when you think about solo mining economics.
Cost Analysis: What Makes Sense for Home Solo Mining
Let’s get real about the numbers here. Solo mining is already a gamble — you’re hoping to hit that one-in-a-million block instead of earning steady pool payouts. Adding significant noise reduction costs on top of power consumption and hardware costs changes the math.
Here’s a practical breakdown of what each noise reduction method costs:
Fan replacement: $40-120 for quality fans. This is the obvious first choice for anyone doing home solo mining. It pays for itself in quality of life immediately, and if you never hit a block, at least you didn’t sink thousands into immersion cooling.
DIY enclosure: $150-300 in materials and probably a weekend of work. Makes sense if you’re handy and have space for a box that’s going to be like 3ft x 2ft x 2ft minimum. For a solo miner running something like an IceRiver KS3M, this could be worth it.
Commercial enclosure: $500-1500. Hard to justify unless you’re absolutely committed to long-term solo mining and have the space. At this price point you’re starting to approach the cost of the ASIC itself for some models.
Immersion cooling: $1000-3000+ for a complete setup. This only makes sense if you’re running multiple ASICs and treating this as a serious long-term operation, or if you’re doing it partly for the learning experience and the cool factor.
Let’s put this in perspective. Bitcoin difficulty right now means a single S19 Pro (110 TH/s) has roughly a 1 in 18,000 chance of finding a block per day. That’s 0.0056% daily odds. The current block reward is 3.125 BTC, worth $66,506 each, so a successful block would net you around $200,000 at current prices.
But if you’re spending $3000 on immersion cooling, that’s eating into your theoretical profit significantly. And if you never hit a block in the first year (which is statistically very likely), that’s money you’ll never recover.
My honest take: Start with fan replacement. If that’s not enough, build a DIY enclosure or move the miner to a garage/basement. Save immersion cooling for when you’ve scaled up to multiple miners and this is more than a hobby.
Alternative Locations: When Noise Reduction Isn’t the Answer
Sometimes the best solution to ASIC noise isn’t reducing it — it’s moving the miner somewhere it doesn’t bother anyone.
Depending on your setup, you might have better options than trying to silence a machine that’s fundamentally designed to be loud:
Garage or shed: If you have a detached garage or storage shed, this is often perfect. You need to run power out there, but then the noise is completely isolated from your living space. Just make sure the temperature doesn’t get too extreme — ASICs can handle heat pretty well but freezing temperatures can cause issues.
Basement: If you have a basement with decent ventilation, this can work great. The floor between you and the miner provides some natural sound insulation. The downsides are potential humidity issues and heat buildup in summer.
Attic: Some people run miners in their attic. This can work but heat is your enemy here — attics get hot in summer, and adding ASIC heat on top of that can be problematic. You need really good ventilation.
Outdoor enclosure: A weatherproof box with proper ventilation can let you run miners outside. You need to protect against rain, snow, and temperature extremes, but it completely solves the indoor noise problem.
For my setup, the basement was the obvious answer. My NerdMiner is quiet enough to run anywhere, but when I was testing my dad’s old L3+, we had it in the basement with an exhaust fan in the window. Worked pretty well actually.
Remote Mining Hosting
Another option worth mentioning: hosted mining. Some companies will host your ASIC in their facility for a monthly fee (usually $50-150 per miner per month depending on power draw). They handle the noise, cooling, and electricity, and you just monitor your hashrate remotely.
For solo mining this is interesting because you maintain control of your mining setup and can point it at solo pools or your own node, while someone else deals with the physical challenges. The downside is obviously the hosting fees eating into your profitability — which is already questionable for solo mining.
Practical Setup Recommendations by Mining Hardware
Different miners need different approaches. Here’s what makes sense for various popular solo mining hardware:
Small USB miners (NerdMiner, Bitaxe, etc.): These run at 35-45 dB, which is already acceptable for home use. No noise reduction needed unless you’re particularly sensitive. A Bitaxe Gamma can sit on your desk without driving you crazy.
Compact ASICs (Goldshell miners, FutureBit Apollo): These run 50-60 dB typically. Fan replacement usually brings them down to comfortable levels for a home office or bedroom. The Goldshell Mini-DOGE Pro is a good example — loud but not insane.
Mid-range ASICs (Older Antminers, L3+, S9): Stock noise 70-75 dB. Fan replacement is mandatory for home use, and you probably want them in a separate room even with quiet fans. A DIY enclosure makes sense if you’re keeping them in your living space.
High-end ASICs (S19 series, L7, KS3): Stock noise 75-80 dB. These need serious intervention for home use. Fan replacement plus enclosure at minimum, or move them to a garage/basement. For reference, an Antminer L7 running stock fans is absolutely brutal to be near.
GPU mining rigs: Typically 60-70 dB depending on how many cards and their fan curves. GPU mining for Ergo solo mining or similar coins is often quieter than ASICs because you have more control over fan speeds. Good case ventilation and quality case fans make a huge difference.
Monitoring and Maintenance for Quiet Mining Setups
Once you’ve implemented noise reduction, you need to stay on top of temperatures and performance. This is especially true if you’ve modified cooling systems.
Most ASICs have built-in temperature monitoring through their web interface. Check these regularly, especially for the first week after any modifications. Your target is usually to keep chip temps under 75°C, though some miners spec up to 85°C as acceptable.
For GPU rigs, software like HiveOS or NiceHash shows per-GPU temperatures. Watch for any cards running hot compared to the others — that usually indicates a cooling problem.
Set up alerts if possible. Many mining dashboard tools can send you notifications if temps exceed thresholds or if your hashrate drops. Since solo mining means you’re running on hope and statistics, the last thing you want is to discover your miner has been offline or thermal-throttling for two days.
Maintenance tasks for quiet mining setups:
- Clean dust from fans and heatsinks monthly (more often if you live somewhere dusty)
- Check acoustic foam in enclosures for degradation or sagging
- Verify fan bearings aren’t starting to fail (listen for rattling or grinding)
- Monitor ambient temperature in your mining space — hot summer days can push things over the edge
- For immersion setups, check fluid levels and clarity
Fan replacement typically needs attention every 6-12 months. Even quality fans will accumulate dust and potentially start making more noise as bearings wear. This is just part of the maintenance cycle for home mining.
Secure Your Winnings
Finding a solo block means receiving 3.125 BTC directly to your wallet — currently worth over $250,000. That amount should never sit on an exchange.
Two hardware wallets we recommend for solo miners:
Ledger Nano X (~$149) — Industry standard, supports BTC natively
Buy Ledger Nano X
Trezor Model T (~$179) — Open-source firmware, strong community trust
Buy Trezor Model T
FAQ: ASIC Miner Noise Reduction for Solo Mining
Can I just put my ASIC in a closet with the door closed?
Technically yes, but you’ll probably create a heat problem. A single ASIC can heat up a small closed space really fast — we’re talking going from room temperature to 40°C+ in less than an hour. You’d need to exhaust the hot air out of the closet somehow, which means ducting or ventilation. Also, closets aren’t usually soundproof, so you’re still going to hear it through the door. Definitely monitor temps closely if you try this.
Will fan replacement void my ASIC warranty?
Almost certainly yes. Most manufacturers consider any internal modifications to void the warranty. In practice, this means if your ASIC dies within the warranty period, you could be out of luck if they notice non-stock fans. Some people swap the original fans back before sending in warranty claims, but that’s risky. For solo mining, where the ROI timeline is uncertain anyway, most people accept this tradeoff for the quality of life improvement.
How much does immersion cooling improve hashrate?
Most people report 5-10% improvements from better thermal performance. When you eliminate hot spots and keep chips consistently cooler, they can maintain higher clock speeds without throttling. Some people also overclock their immersion-cooled ASICs since the cooling headroom is so much better. That said, for solo mining, an extra 10% hashrate still means your odds of hitting a block only go up by 10% — you’re still playing the lottery, just with slightly better odds.
Is it worth noise-reducing a small miner like a Bitaxe for solo mining?
Probably not. Small miners like the Bitaxe or NerdQAxe++ are already pretty quiet at 35-45 dB. You can run these in any room without issue. The money and effort you’d spend on additional noise reduction would be better invested in just buying more hashrate or saving for a larger miner. These devices are more about the fun of solo mining and learning than realistic block finding.
What’s the quietest way to solo mine Bitcoin at home?
The absolute quietest setup would be small-scale USB miners like the FutureBit Apollo II or Bitaxe running in your office. These deliver 0.5-2 TH/s at around 40-50 dB, which is quieter than most PC gaming rigs. The tradeoff is that your chances of finding a block are microscopic — you’re basically running a Bitcoin full node that occasionally plays the lottery. But if quiet home operation is your priority and you understand the odds, this is the way to go.